How to Brew
So you've got all your equipment, now what? Well before you can dive in and make a fine tasty brew, let's first make sure you have all of the necessary accouterments you need to do your brew successfully:
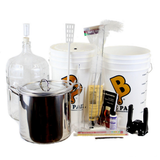
- Large pot (16-20+ Qt. stainless steel recommended)
- Ingredients (Malt extracts, grain if included in recipe, hops, fresh yeast, and good-tasting water)
- Large spoon
- Sanitizer (such as Iodophor or StarSan)
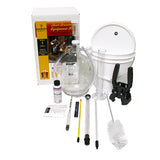
- Fermenter and airlock
- Thermometer
- Immersion Wort Chiller or extra ice
- Colander/Strainer (optional)
- Hydrometer (optional)
- Funnel (if fermenting in a carboy)
1) Allow yourself about 2.5 hours to brew. As you become more proficient, it will take less time. Remove your yeast from the refrigerator and allow it to incubate to room temperature. Also, if possible, pre-chill about 3 gallons of water; you will use this later to top of your wort (unfermented beer) in the fermenter.
2) Add about 2.5-3 gallons of water to your pot (called a kettle in the brewing world). Bear in mind that you will be adding extracts later and wort has a tendency to want to boil over, so leave room in your kettle and don't fill it completely. If there are no steeping grains included in your kit, move on now to step 4. With the water in the kettle, turn the heat on high and bring the water to 150-155F. Remove kettle from heat and add your steeping grains and allow to steep for about 45 minutes. It's okay if the temperature drops during this time. It's important not to overheat (175+F) or boil the grains, as doing so will leach tannins and excess proteins from the grain and into your beer.
3) After 45 minutes has passed, remove the grains from kettle and place in colander over kettle. Allow grain juices to drain back into kettle. You may wish to pour some hot water (168F) through the grain bag in order to rinse the trapped sugars out of the bag and into the kettle. Resist the urge to squeeze the bag. Alternatively, instead of using a colander, you can simply place the grains in a bowl and let sit. Later, add the drippings from the bowl to your kettle.
PRO-LEVEL TIP: You can save time by doing your grain steep in a separate, smaller pot while you move forward to Step 4. When the steep time is complete, simply add the "tea" to your brew kettle with the rest of your boiling wort.
4) Bring your "grain tea" (or just water if no grains are included in your kit) to a boil by turning the heat on high. When you are at a near boil, turn the heat down to simmer and stir in your extracts. Be careful not to let extracts clump up or fall to the bottom and scorch; stir well! Once you have added all of your extract, crank the heat back to high in order to get your wort boiling. BE AWARE at this point. As the wort approaches boiling, it will quite suddenly want to boil up and over the pot. Simply turn down the heat or slide the kettle off the burner. Blowing on the foaming madness also helps settle it down. Return to high heat. It may try again to boil over, simply repeat the process. When the boil over effect ceases and your wort is happily boiling, start your timer.
5) Follow the boil time and hopping schedule listed on your recipe. Most beers have a boil time of approximately one hour. Add hops as directed. For example, if the directions call for adding one ounce of Columbus at 10 minutes, then wait until your wort has been boiling for ten minutes before adding your Columbus hops. If you are to add one ounce of Cascade at 35 minutes, then this addition is made 35 minutes into the boil (not 35 minutes after the previous hop addition). Hop additions at the end of boil are made when you turn off the heat and are ready to chill the wort.
6) Chill the wort. Use an immersion wort chiller or an ice bath to accomplish this task, as rapid cooling is important to help prevent spoilage and off-flavors. If using an ice bath, make sure you place the kettle into the bath; do not add ice directly to the beer wort, as this risks infection. While your wort is chilling, sanitize your fermenter and airlock. Once the wort temperature is at about 110-120F (periodic gentle stirring of the wort helps it cool faster) add it to your sanitized fermenter and top up to the 5 gallon mark with your chilled water. If desired, take a gravity reading with your sanitized hydrometer at this point.
NOTE: You may wish to pour the wort through a strainer or colander to help filter out hop material, but this is at the discretion of the individual brewer; it is not necessary.
With the lid securely on your fermenter, rock the fermenter vigorously to aerate wort. This is the only time in the brewing process that you want to splash your beer, but here splash it A LOT! The yeast will use the oxygen to reproduce before turning your beer wort into delicious beer! Aerate for several minutes.
7) With the wort temperature now at about 70-75F, pitch (add) the yeast. Do this by shaking the package of yeast vigorously to create a slurry and then carefully open it (it may foam a bit). If you are using dry yeast, you may simply sprinkle it into your wort or "start it" by rehydrating it in about a cup of warm water 15 minutes prior to pitching. Pour the yeast into the fermenter, seal the fermenter, and set the airlock in place. Do not forget to fill the airlock halfway with water, or better yet some sanitizer or vodka.
8) Place the fermenter in a location out of the sun and with fairly steady temperatures. Ferment for about two weeks (activity in the airlock will usually cease before then). Take a gravity reading with your sanitized hydrometer to insure fermentation is complete. If not, allow to finish fermenting. Once finished, proceed to bottling or kegging!
For handy dandy brewing calculations or to craft your own recipes, we really enjoy Brewer's Friend brewing software!